E-token Time For Indian Visa
Most of the people know that, To get Indian Visa E-token is too much difficult. If you able to try just perfect time, may be you will get an e token for Indian visa. We try to serve you the perfect time for E-token in this site Every day.
New system For Indian E token July 11 2015
Surely everyone is doing well. I am with you again. This is my "New System for Indian E-token- 2015". Indian authorities did not consider that Bangladeshi, people are mankind. Last Friday afternoon once again they change their websites system and in front of us brought a new critical situation. Active all tricks have to change for this situation. Come and see the new system
Make Your Pc Faster In An Easy Way-part-3
Slim Cleaner is a free software for cleaning and optimizing PC and Mobile Device. It's a Golden Verified Partner of Microsoft Corporation. Specially Designed for WinXp, Vista, Win7, Win 8 and Win 10.
Remove shortcut virus in 30 second
Here we will show how you can easily get rid of this problem and remove "Shortcut Virus" from your PC.
Required Documents for Indian Visa Purpose
In fact, most of people do not know what to do when submit an e-token to IVAC/Visa Processing Center/Indian Embassy and which documents they have to collected and sorted. In the mean time, many local broker or fraud lead them to earn some big amount from sufferer. Let’s go to topic.
Wednesday, 8 November 2017
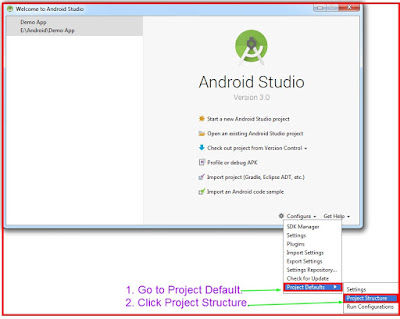
How to configure Android Studio JDK Location.
Sunday, 29 October 2017
Windows 10 Unexpected Shut Down Problems Solved in easy way
Sometimes We Faced a great problems in Windows 10 which is Unexpected Shut Down. Many people when start their desktop pc or Laptop after seen the win 10 logo screen the device is Shut Down automatically but start again the operating system run simply. Now I'm going to describing how to Unexpected Shut Down Problems Solved in easy way. let's go.... When your windows run in second time please click right button your mouse at start menu choose "power option" and click. Now can see settings option. Click "Additional power Settings". Then you can see a new window "Choose what the power button does" and click that. Then find out "change settings that are currently unavailable" and click. Look the check box "Turn on fast startup (recommended)". uncheck the the box then save. Now restart your pc the problems has gone away.
Active Windows 10 in One minute
Features new to Windows 10 Windows 10 harmonizes the user experience and functionality between different classes of device, and addresses shortcomings in the user interface that were introduced in Windows 8 Windows 10 Mobile, the successor to Windows Phone 8.1, shares some user interface elements and apps with its PC counterpart.The Windows Runtime app ecosystem was revised into the Universal Windows Platform (UWP). These universal apps are made to run across multiple platforms and device classes, including smartphones, tablets, Xbox One consoles, and other compatible Windows 10 devices. Windows apps share code across platforms, have responsive designs that adapt to the needs of the device and available inputs, can synchronize data between Windows 10 devices (including notifications, credentials, and allowing cross-platform multiplayer for games), and are distributed through a unified Windows Store. Developers can allow "cross-buys", where purchased licenses for an app apply to all of the user's compatible devices, rather than only the one they purchased on (e.g., a user purchasing an app on PC is also entitled to use the smartphone version at no extra cost). On Windows 10, Windows Store serves as a unified storefront for apps, music, films, TV series and ebooks. Windows 10 also allows web apps and desktop software (using either Win32 or .NET Framework) to be packaged for distribution on the Windows Store. Desktop software distributed through Windows Store is packaged using the App-V system to allow sandboxing.
![]() |
| Windows 10 Activator |
Wednesday, 25 October 2017
Chameleon V.7.9 Photo Collage Creation Free Download
Chameleon is a photo collage creation software.
This ingenious program makes the process easy and entertaining. Earlier one had to thoroughly select an object before pasting it into a new background; with this software this tedious part of the workflow is no longer a burden. You can concentrate on the creative part and forget about complicated selection techniques.
With Chameleon you can have fun in making photo collages!
The software works in four modes: Montage mode, Chameleon mode, Blend mode, and Emersion mode.
Using one of these modes of collage creation, you'll be able to create seamless montages that automatically smooth edges, make the object semi-transparent dissolving the pasted image in the background, etc.
Each mode offers its own unique features. For example, in Chameleon mode, from which the program gets its name, an object is pasted into a picture adapting to the new color range and blending with the background, as chameleons do.
The software can be helpful to home users who are not experienced in image editing. You can create customized postcards for your loved ones; make a wedding album using all kinds of photos and backgrounds; "open" closed eyes, change the appearance of a person, etc.
Designers will appreciate this program as it allows them to combine images with entirely different color ranges or to create the effect of drawing on a texture surface (crumpled paper, wood, etc), and all that with only a mouse-click.
Download Link:
Saturday, 21 October 2017
Photoshine 2017 Crack Plus Serial Key Free Download
PhotoShine Latest Version is excellent software which shines favorite images into beautiful. Users will use these pictures for the front page of email and social media accounts. It shines photos according to your requirements. It improves physical look of dull images.
PhotoShine Crack also helps to change the background and color effects of any format. Users can use this software for editing images of JPEG TIFF, PING, GIF, etc. Its user-friendly interface is easy to use. It’s all photo editing features are very easy to use like simple editing software.
Photoshine Keygen is helpful to change results of images. It is also useful to insert extra features in simple images. Users will easily share these edited images with loving ones through Skype, Facebook, and other social media accounts.
Photoshine License Key is essential software to improve image quality which you capture with the mobile, digital or SD camera. It improves bad look background images into shining. These emitted images will attract simple and professional users. Users can use this software for changing the size of image, position, and background. Photoshine Full Version will change colorful images into the black and white sketch. It is the only editing software which supports all camera captured images. Users can also use this software for creating photos, magazines, and newspapers. It helps to create photos in different shapes which you can use for various purposes.
PhotoShine Free Download gives an easy way to add a photo into different beautiful templates. Users can easily insert the photo into a classical love style template, a baby cartoon template, a pink girl style template, or a magazine cover template, etc with one click. <strong>PhotoShine Registration Key includes 680 templates
Download Link:
Photoshine 2017 Crack Plus Serial Key | 72 MB
Monday, 16 October 2017
Free Download SmartMask For Best Photo Editing
SmartMask v.4.0 introduces two modes of image processing that intelligently assist with the selection a user wants to make. Auto mode offers a powerful algorithm for automatic recognition of areas while Manual mode includes a set of smart and helpful brushes to touch up the results where needed. For simple images, a user can take advantage of pencil tools in Auto mode to achieve professionally looking results in just a few clicks. With a blue pencil it is possible to draw a line inside the object a user wants to select (for example, a single face on a group photo), and then use the red pencil to create lines outside the object to define the areas that should be cut out (for instance, other people on the same photo). In cases where the selected object stands against a background of a similar color range, or the object’s edges are uneven, Manual mode offers powerful touch-up brushes like the Magic Brush and Background Eraser.
Download Link:
Photo Editor Tools SmartMask v.4.0 | 53 MB
Thursday, 5 October 2017
Online Indian Visa Application Processing Fee Payment For Bangladesh
All had to use U-Cash to submit a visa application fee manually. But now, The High Commission of India in Bangladesh has been taking various initiatives to make the visaOctober, 2017. This means an applicant will be able to pay the visa application processing fee using online modes of payment. Applicants will need to fill in the application form and make payment online before visiting an IVAC for submission of application. Please note that the online payment facility is open only to Bangladesh Passport holders. The existing mode of payment of visa application processing fee through mobile wallets also will continue until further notice.
Here, we use screenshots and descriptions, which can help the Visa Applicant to pay the visa fee correctly.
At first, the Applicant (referred to as ‘User’ or ‘You’ hereinafter) has to go to the https://indianvisa-bangladesh.nic.in/visa/Registration to fill up the online application.
Then go to https://payment.ivacbd.com page to initiate the Indian Visa Processing Fee Payment.
To learn How to fill up Indian visa application Form Click here.
You will get a Form that includes 4 (four) tabs as follows, which you will need to fill in sequentially:
- Application Info
- Personal Info
- Overview
- Payment
1 Application Info
Follow the below step-by-step process to complete- SELECT A MISSION: From the drop-down list select the Mission under which you have applied for the Visa. This will change the options under SELECT YOUR IVAC CENTER below.
- WEB FILE NUMBER: In the next two boxes enter your WEB FILE NUMBER. Both entries must be same.
- SELECT YOUR IVAC CENTER: From the drop-down list select the IVAC center under which you have applied for Visa. As soon as you select the IVAC center name, the AMOUNT in BDT below will update (varies between BDT 600 and BDT 700).
- VISA TYPE: Select the Visa type that you have applied for from the drop-down list.
- PASSPORT NUMBER: Enter your passport number correctly.
- Save and Next: After done with filling up the above, click on the ‘Save and Next’ button to proceed to the next tab. Note that this button will be activated only after you have completed the above fields.
2 Personal Info
Follow the below step-by-step process to complete Tab-2: Personal Info:- (i) Enter your FULL NAME (as it appears in your passport), EMAIL ADDRESS* (provide a valid Email ID, where you will get all invoices and notifications) and CONTACT NUMBER (provide a valid mobile number where you will get SMS notifications).
*Email address field is optional, but if Email address is not provided, you will not receive any payment invoice over email. - Select and APPOINTMENT TYPE from the drop-down list. If you select WALK-IN, then you are done with this tab. However, if you select DATE, another box will appear where you will need to select an APPOINTMENT DATE from a pop-up calendar as mentioned in your Visa application.
- (i) After done with the above, click on the ‘Save and show overview’ button below, which is activated only after completing all the mandatory fields above.
3 Overview
As you click on the ‘Save and show overview’ button in the previous tabs i.e. Tab-2 and Tab-3: ‘Overview’ opens as below. This tab provides you a summary of the information you have entered in the first two tabs. This is to review if you have provided all information in the earlier tabs correctly.In the Overview tab, you cannot edit or do not need to enter anything. However, if you find any mistake and want to edit any field, click on ‘EDIT YOUR INFORMATION’ link below. You can edit the previous tabs and come back to Overview again. As well you can click any previous tab(s) and edit your information, if required.
After done reviewing, click on ‘Confirm and move for payment’ button below. You must click to tick the checkbox beside ‘I agree to the Terms of Service’ to proceed. Without selecting the checkbox you cannot proceed to Payment. You can view the ‘Terms of Service’ by clicking on the hyperlink.
4 Payment
After you have completed the Application Info and Personal Info tabs, and finally clicked the ‘Confirm and move for payment’ button under the Overview tab, the following ‘Payment’ page will appear.Here you will see multiple payment options under SSLCOMMERZ Payment Gateway such as Debit/Credit CARDS, INTERNET BANKING, MOBILE FINANCIAL SERVICES (MFS) and OTHERS i.e. Proprietary Cards.
Select your desired payment method from the available options. As soon as you select the payment option, e.g. VISA or MasterCard, you will see the ‘Payable Amount’ at the right side of the page, which is the total amount after addition of Convenience Fees with Visa Application Processing Fees.
If you are ready to pay, complete the Captcha by entering the letters and/or numbers you see under ‘Verify you are human’ and then click on the ‘Pay Now’ button to proceed to make the payment.
You can still EDIT YOUR INFORMATION by clicking on the hyperlink or previous tab(s). Please note that once you click on ‘Pay Now’, the edit option will no longer be available.
Note: It is possible to make bulk/multiple payment for different Applicants (e.g. for your family members or tour partners) with different Web File Numbers and make total payment in a single transaction. Please refer to the next page (point 4.1) in this regard.
4.1 Bulk/Multiple Payment (Maximum 7) in One Go
To make bulk/multiple payment, after completing the first one, click on ‘ADD ANOTHER WEB FILE NUMBER’ button located in the ‘Payment’ tab. Then fill in the fields with another applicant’s information and check overview following the same procedure as done for the first one (Point 1.1 to 1.4).SCREENSHOT is to be added after Site update
As you complete the fields for the second applicant and come to the ‘Payment’ tab, you will see the FEES, Convenience Fees and total Payable Amount have been automatically updated.
Follow the same procedure to add the next Web File Number. In this way you can add maximum 7 applicants’ information. The Visa Processing FEES and Convenience Fees for each applicant will be added automatically and the total Payable Amount will be updated accordingly. After filling up the information of the 7th applicant, the ‘ADD ANOTHER WEB FILE NUMBER’ button will be disabled.
4.2 Payment Completion After completing the process from 1.1 to 1.4 or 1.5, click on the ‘Pay Now’ button under the ‘Payment’ tab to proceed to pay the total ‘Payable Amount’. You will be redirected to the following Payment Page*. *The Payment Page screen will vary based upon your selected payment option (Card, Internet Banking or Mobile Banking.
Please note that once you click on ‘Pay Now’, you cannot make any further editing.
Enter your card credentials here and click on the ‘Pay’ button below to make the payment. For other payment options like Internet Banking or Mobile Banking, other options will appear where you need to enter your credentials.
If you have entered the information correctly, clicked on the ‘Pay’ button, and if the mentioned amount is available in the card/account/wallet, the payment will be made. After successful payment, an onscreen ‘Congratulations’ message along with a Transaction ID will appear as below (next page):
You can download the invoice of the payment in PDF file format by clicking ‘DOWNLOAD PDF OF INVOICE’ button. To take a printout of the invoice click on ‘PRINT INVOICE’ button.
If you have provided a valid email address, a copy of this invoice will also be sent to your email address. In case of multiple/bulk payment, there will be an item-wise invoice generated and sent to your email address. You shall also receive SMS notification(s) in your provided mobile number.
4.3 Check Payment Status
If you have applied for an Indian Visa and/or you wish to check your payment status, click on CHECK PAYMENT STATUS button at the top-right corner of the page.The below window (next page) will appear where you need to enter your WEB FILE NUMBER, PASSPORT NUMBER, the words in the captcha under ‘Verify you are human’ and then click on ‘Check Payment’.
After clicking on ‘Check Payment’, the below information will appear under ‘Your Payment Status’, which includes summary of your provided information along with your PAYMENT STATUS, ‘PAID’ or ‘UNPAID’.
Note: You can check this Payment Status for 15 (fifteen) days since you have made the payment. After 15 days this information will not be available anymore. You can also download and/or print your payment invoice by clicking on the respective button below.
Tuesday, 19 September 2017
What Is CMOS and What Is It For
CMOS (complementary metal-oxide-semiconductor) is the term usually used to describe the small amount of memory on a computer motherboard that stores the BIOS settings. Some of these BIOS settings include the system time and date as well as hardware settings.
Most talk of CMOS involves clearing CMOS, which means to reset the BIOS settings to their default levels. This is a really easy task that's a great troubleshooting step for many types of computer problems.
Note: A CMOS sensor is different - it's used by digital cameras to convert images into digital data.
Other Names For CMOS
CMOS is sometimes referred to as Real-Time Clock (RTC), CMOS RAM, Non-Volatile RAM (NVRAM), Non-Volatile BIOS memory, or complementary-symmetry metal-oxide-semiconductor (COS-MOS).
How BIOS and CMOS Work Together
The BIOS is a computer chip on the motherboard like CMOS except that it's purpose is to communicate between the processor and other hardware components like the hard drive, USB ports, sound card, video card, and more. A computer without a BIOS wouldn't understand how these pieces of the computer work together.
See my What Is the BIOS? piece for more information on the BIOS.
CMOS is also a computer chip on the motherboard, or more specifically a RAM chip, which means it would normally lose the settings it's storing when the computer is shut down.
However, the CMOS battery is used to provide constant power to the chip.
When the computer first boots up, BIOS pulls information from the CMOS chip to understand the hardware settings, time, and anything else that's stored in it.
What Is a CMOS Battery?
The CMOS is usually powered by a CR2032 cell battery, referred to as the CMOS battery.
Most CMOS batteries will last the lifetime of a motherboard, up to 10 years in most cases, but will sometimes need to be replaced.
Incorrect or slow system date and time and loss of BIOS settings are major signs of a dead or dying CMOS battery. Replacing them is as easy as swapping out the dead one for a new one.
More About CMOS & CMOS Batteries
While most motherboards have a spot for a CMOS battery, some smaller computers, like many tablets and laptops, have a small external compartment for the CMOS battery that connects to the motherboard via two small wires.
Some devices that use CMOS include microprocessors, microcontrollers, and static RAM (SRAM).
It's important to understand that CMOS and BIOS are not interchangeable terms for the same thing. While they work together for a specific function within the computer, they are two entirely different components.
When the computer is first starting up, there's an option to boot into BIOS or CMOS. Opening the CMOS setup is how you can change the settings it's storing, like the date and time and how the different computer components are first started up. You can also use CMOS setup to disable/enable some hardware devices.
CMOS chips are desirable for battery-powered devices like laptops because they use less power than other types of chips.
Although they use both negative polarity circuits and positive polarity circuits (NMOS and PMOS), only one circuit type is powered on at a time.
The Mac equivalent to CMOS is PRAM, which stands for Parameter RAM.
Monday, 18 September 2017
How to do clear a laptop BIOS or CMOS password
A laptop BIOS password is more secure than a traditional desktop to help protect the data if it was stolen. If you are the original owner of the laptop, we highly recommend contacting the manufacturer of the laptop. Companies such as Dell, Lenovo, and Toshiba can reset the password if you are the original owner using the Service Tag, disk, or give you exact steps for your laptop.
If you are not the original owner of the laptop, there are some ways to bypass the password depending on the manufacturer and model of the laptop.
5 to 8 character code on System Disabled screen
- As the computer is booting, press F1, F2, or Del to enter CMOS setup.
- In the CMOS setup, when prompted for a password, guess three times until you're given the code. If, after entering the wrong password three times, the computer is displaying a 5 to 8 character code, as shown in the picture, continue to the next step.
- Write down the code and visit Dogbert's BIOS Password Backdoors scripts page to download Python and the free Python scripts to clear many of these types of passwords.
If the above suggestions do not apply to your laptop, you need to open the laptop and clear the password using dip switches or jumpers. You may also be able to jump the BIOS using a paperclip, by soldering a wire to pins on the BIOS, or replacing the BIOS chip.
The location of dip switches or jumpers on the motherboard depends on the brand and model of your laptop. Check the technical documentation for your laptop and contact the manufacturer to determine which motherboard is in your laptop. Search the Internet for that motherboard model for a technical diagram of where components are located, including the dip switches or jumpers for resetting the BIOS.
Which step you take depends on the manufacturer and model of your laptop computer. For most end users, we highly recommend having the laptop serviced by a qualified technician who can properly disassemble a laptop.
Contact laptop manufacturer
Additional information
See the CMOS definition for related links and information.Tuesday, 2 May 2017
How To Create A Free Website With Blogger
Did you know you can use Google’s Blogger to host a regular looking website? It’s not just for blogging anymore. Blogger gives you the ability to create great looking websites in less than a day.
Step 4: At this moment write your mail password in to the password box and click sign in or hit enter button on your keyboard.
Step 6: Write a display name and Click on Continue to Blogger.
Step 8: There are two blank box one is title box and other is your domain or web address box. At first write your blog title and then choose your domain until can see available. I have written a domain but not available for reason try another another and another.