E-token Time For Indian Visa

Most of the people know that, To get Indian Visa E-token is too much difficult. If you able to try just perfect time, may be you will get an e token for Indian visa. We try to serve you the perfect time for E-token in this site Every day.

New system For Indian E token July 11 2015

Surely everyone is doing well. I am with you again. This is my "New System for Indian E-token- 2015". Indian authorities did not consider that Bangladeshi, people are mankind. Last Friday afternoon once again they change their websites system and in front of us brought a new critical situation. Active all tricks have to change for this situation. Come and see the new system

Make Your Pc Faster In An Easy Way-part-3

Slim Cleaner is a free software for cleaning and optimizing PC and Mobile Device. It's a Golden Verified Partner of Microsoft Corporation. Specially Designed for WinXp, Vista, Win7, Win 8 and Win 10.

Remove shortcut virus in 30 second

Here we will show how you can easily get rid of this problem and remove "Shortcut Virus" from your PC.

Required Documents for Indian Visa Purpose

In fact, most of people do not know what to do when submit an e-token to IVAC/Visa Processing Center/Indian Embassy and which documents they have to collected and sorted. In the mean time, many local broker or fraud lead them to earn some big amount from sufferer. Let’s go to topic.

Monday, 27 November 2017

Error26, 13 Failed to resolve com android supportappcompat v727

How you setup the Android Support Libraries in your development project depends on what features you want to use and what range of Android platform versions you want to support with your application.
This document guides you through downloading the Support Library package and adding libraries  
 to your development environment.
The support libraries are now available through Google's Maven repository. We no longer support downloading the libraries through the SDK Manager, and that functionality will be removed soon.Choosing Support Libraries

Before adding a Support Library to your application, decide what features you want to include and the lowest Android versions you want to support. For more information on the features provided by the different libraries, see Support Library Features.

Adding Support Libraries In order to use a Support Library, you must modify your application's project's classpath dependencies within your development environment. You must perform this procedure for each Support Library you want to use.


  • Add the support library to the dependencies section. For example, to add the v4 core-utils library, add the following lines:
    dependencies {
        ...
        compile "com.android.support:support-core-utils:27.0.0"
    }
  • Caution: Using dynamic dependencies (for example, palette-v7:23.0.+) can cause unexpected version updates and regression incompatibilities. We recommend that you explicitly specify a library version (for example, palette-v7:27.0.0)

    Google switch to using their own Maven repository instead of downloading them through the Android SDK which is why Android Studio could not find the 26.0.0 version. See the instructions below to add this as a repository to your build.gradle to start using this new repo. https://developer.android.com/topic/l... If you are not ready to update your project yet and are still starting 25 or lower with targetSdkVersion you can add the following decencies to override the ones included by the SDK. compile 'com.android.support:support-v4:25.+' compile 'com.android.support:customtabs:25.+' Update: I have also added this to our troubleshooting section. https://documentation.onesignal.com/d... The Code Is Here:

    Your Download Code Is Here: Click To Download

    Wednesday, 15 November 2017

    The Easy Solution On Gradle Dependency Cache May Be Corrupt Error In Android Studio

    Gradle Dependency Cache May Be Corrupt Error In Android Studio

     Someone ask a question in a apps related facebook group: Such as "Gradle Dependency Cache May Be Corrupt Error In Android Studio".  I updated my Android Studio and it asked me to update my Gradle plugin package  that created issues with my running projects. I've gone through all the Stack solutions and nothing worked for me. What can I do now? This question stuck in my mind and I'm trying to find an easy way to solve the error. Finally, I have the solutions which will help people to solve the error message instantly.
    Gradle Dependency Cache May Be Corrupt Error In Android Studio

    At first, open your Android Studio and go to "gradle-wrapper.properties" Under the App project and double click. Look at the right side and copy the gradle web link
     
    Gradle Dependency Cache May Be Corrupt Error In Android Studio

    Now open your browser and paste the link go the gradle download website. Copy the Gradle Package Like as like as shown above.After Loading the website Press F+Ctrl and paste which you have copied from android studio yet. you will find out the desired gradle. Download it. When  download will finish, extract or unzip with any extractor like Win Rar. More instructions in bellow image.

    Gradle Dependency Cache May Be Corrupt Error In Android Studio

    Now, Copy The unzip gradle folder and go to the directory "C:\Program Files\Android\Android Studio\gradle" and paste here the copied to unzip the gradle folder.

    Gradle Dependency Cache May Be Corrupt Error In Android Studio

    After successfully pasting the folder, came back your Android Studio and click Settings under the File menu such as the bellow picture.
    Gradle Dependency Cache May Be Corrupt Error In Android Studio

    Here, you have to click the menu "Build, Execution, Development". Now double click the on Gradle. The gradle properties must be open. Then click the radio button and then browse icon as shown in the image bellow.

    Gradle Dependency Cache May Be Corrupt Error In Android Studio

    Now, A new window will be seen and just browse the location "C:\Program Files\Android\Android Studio\gradle\gradle-3.2". (P. S. I used Gradle 3.2 only for example. Basically, it work with all version). Press Ok and you will see the window closed automatically. Then, press Apply and OK. This window will automatically close too.

    Gradle Dependency Cache May Be Corrupt Error In Android Studio

    Finally, you have to need to click "Try Again" on the error message on top of the middle. Your problems is solved! 

    Gradle Dependency Cache May Be Corrupt Error In Android Studio

    Now Enjoy the "Android Studio" and make lots of Apps.If you have any questions then feel free to ask. I will try to answer as soon as possible.

    Monday, 13 November 2017

    Use Your Android Phone as Emulator on Android Studio

    Use Your Android Phone as Emulator on Android Studio
    Many people who becomes an android developer but when they try to run their android emulator on android studio face problems as per PC configuration. Now I'm going show in what way  Use Your Android Phone as Emulator on Android Studio. So let's go how to do it.
    At first open Android  Studio go to  left-top corner file menu and click or press Ctrl+Alt+S. See the image bellow.
    Use Your Android Phone as Emulator on Android Studio
    Now open a new window. If can't see the bellow interface please type "SDK" in search box. now can see the bellow interface then click "SDK Tools". After Clicking SDK tools find "Google USB Driver" in the list and click the check box then click apply then OK.
    Use Your Android Phone as Emulator on Android Studio
    After while click Apply and Ok will come an warning box click OK.
    Use Your Android Phone as Emulator on Android Studio
    Now start download some component. When the necessary Component the finish button will be alive now click "Finish"
    Use Your Android Phone as Emulator on Android Studio
    Finally can see "Google USB Driver" with green tick now press apply and ok again.
    Use Your Android Phone as Emulator on Android Studio
    Here is in new part for you. So minimize all application and right click on " My computer" here open a drop down menu click on " Manage" in the drop down menu.
    Use Your Android Phone as Emulator on Android Studio
    Now Right click on Unknown Yellow mark Device then Click update driver software.
    Use Your Android Phone as Emulator on Android Studio
    Here you have to click red mark box which is shown bellow image.
    Use Your Android Phone as Emulator on Android Studio
    Now change the directory or path by clicking brows. example: C:\Users\Sham\AppData\Local\Android\sdk\extras\google\usb_driver. Then Click next.
    Use Your Android Phone as Emulator on Android Studio
    Here is new part for you. Click here  and go to the link web and download your driver.
    Use Your Android Phone as Emulator on Android Studio
    So you’ve finally decided to root your phone and install a custom ROM, or maybe you want to sideload an app from your computer. Before you can jump into ADB commands and perform some software surgery on your phone, you have to enable the Developer options.Cleverly hidden away from the average user, enabling Developer options is incredibly easy to do if you know where to lookHere’s how to get there on a few popular devices:

    Use Your Android Phone as Emulator on Android Studio
    While enabling Developer Options is done in the same way for every Android phone or tablet, OEMs don’t always put the option in the same place. Navigate your phone to the “Build number” portion of the settings, which can be tucked away and buried in sub menus.

    Stock Android: Settings > About phone > Build number
    Samsung Galaxy S5: Settings > About device > Build number
    LG G3: Settings > About phone > Software information > Build number
    HTC One (M8): Settings > About > Software information > More > Build number

    Once you’ve found the Build number section of the settings, tap on the section 7 times. After two taps, a small pop up notification should appear saying "you are now X steps away from being a developer" with a number that counts down with every additional tap.

    Use Your Android Phone as Emulator on Android Studio
    Tap now can see the massage " You are now a developer"
    Use Your Android Phone as Emulator on Android Studio
    To enable USB Debugging, you’ll need to jump into the Developer options menu, scroll down to the Debugging section, and toggle the “USB Debugging” slider.
    Use Your Android Phone as Emulator on Android Studio
    Once upon a time, USB Debugging was thought to be a security risk if left on all the time. Google has done a few things that make that less of an issue now, because debugging requests have to be granted on the phone—when you plug the device into an unfamiliar PC, it will prompt you to allow USB debugging (as seen in the screenshot below)
    Use Your Android Phone as Emulator on Android Studio
    If you still want to disable USB debugging and other developer options when you don’t need them, slide the switch at the top of the screen. Easy press.
    Use Your Android Phone as Emulator on Android Studio
    Developer Options are power settings for developers, but that doesn’t mean non-developer users can’t benefit from them as well. USB debugging is required for things like adb, which in turn is used for rooting devices. Once your device is rooted, the possibilities are endless.
    Now Connect Your Android Phone with USB cable And Enjoy Emulator

    Wednesday, 8 November 2017

    How to configure Android Studio JDK Location.

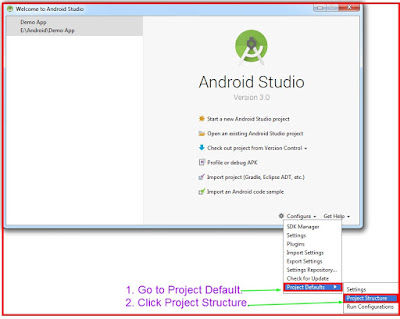
    Sometimes we faced a common problems about Android Studio JDK Location. Now I'm going to describe Step by step How to  How to configure Android Studio JDK Location. With Img.So at first open your android Studio and can see the below interface.
    How to configure Android Studio JDK Location.
    Click the configure arrow and go to project default then go to project structure. 
    How to configure Android Studio JDK Location.

    Now open a new window like below pic. Firstly uncheck the JDK location check box. Then go to Drive "C"=>Program Files=>Java=>JDk File. Now Copy the JDK file path and paste   Android Studio JDK Location box like below image.

    How to configure Android Studio JDK Location.

    Press ok. Now Your Android Studio JDK Location problems is solved.


    Contact Us

    Name

    Email *

    Message *

    Pageviews from the past week

    They Love Us!

    Protected by Copyscape

    Like Us On Facebook